.png)
2026-07-13 Release Notes
OnTarget Release Notes
OnTarget Mobile Application
1. Signing Webforms
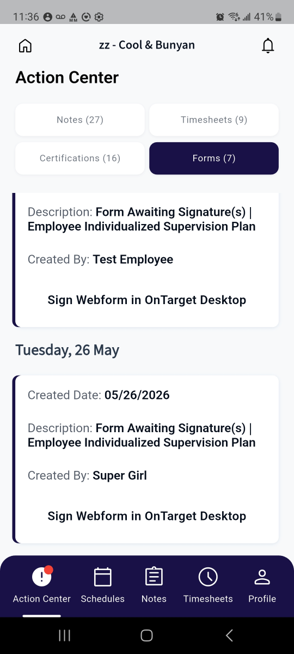
Users can now sign Webforms directly from within the mobile application by navigating to the Action Center > Forms tab. When users are assigned Webforms to sign, the mobile application lists a card for each Webform. The card contains the relevant information regarding the Webform allowing users to quickly identify assigned forms.
Please Note: At this time, signing Webforms within the mobile application is available for outlet associated Webforms only.
The Forms tab displays Webforms that require the user’s signature and once signed, the card is removed from the Forms tab.
Within the Action Center > Forms tab, users are provided with a list of assigned Webforms via a displayed card. Assigned Webforms that support singing from the Mobile application contain a “Sign Form” button. Webforms that do not currently support signing from the Mobile application contain a notice listed as “Sign Webform in OnTarget Desktop”.
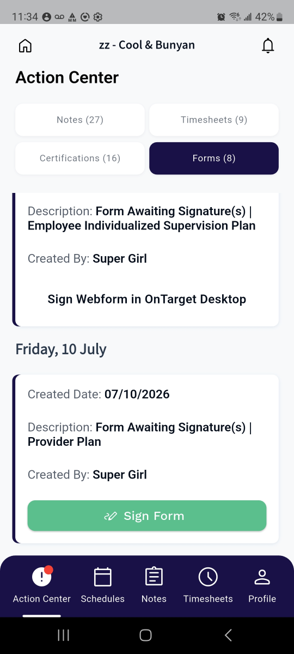
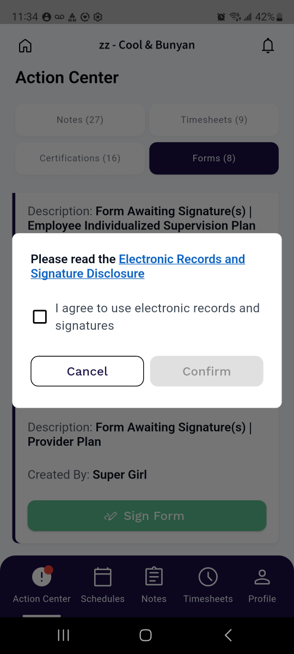
Clicking the “Sign Form” button reveals a pop-up window containing a notice for users to agree to utilizing an electronic signature. The window includes a link to the OnTarget Electronic Signature Agreement which opens on an external web page.
The window also contains buttons for Cance and Confirm. The Cancel button may be used to cancel the Webform Sign process. The Confirm button is not available until the user selects the checkbox agreeing to use electronic record signatures.
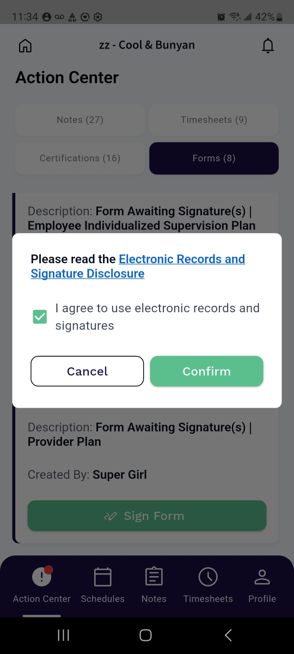
Clicking the Confirm button for the electronic record signature agreement opens the Webform within an external web page outside of the Mobile application. This allows users to return to the Mobile application that is needed without affecting the opened Webform waiting to be signed.
Please Note: Based on the content of the Webform, users are provided with view options such as zoom in, zoom out, portrait view, or landscape view. These options enable users to easily read the content of the Webform.
Users may scroll trough the Webform to locate the “Click to Sign” button(s). Utilizing this button follows the same process end users experience in OnTarget desktop.
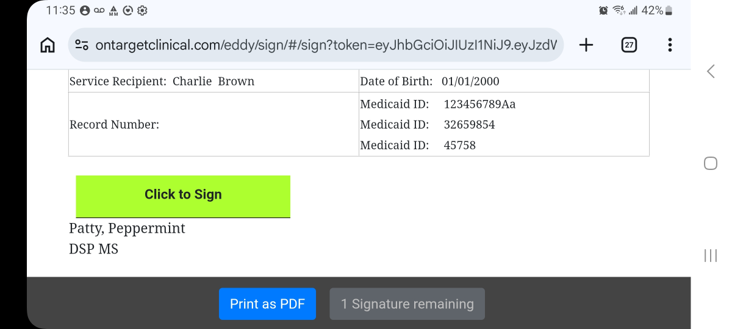
When the“Click to Sign” button is clicked, a pop-up window is displayed allowing users
to select to “Adopt and Sign” using an electronic signature.
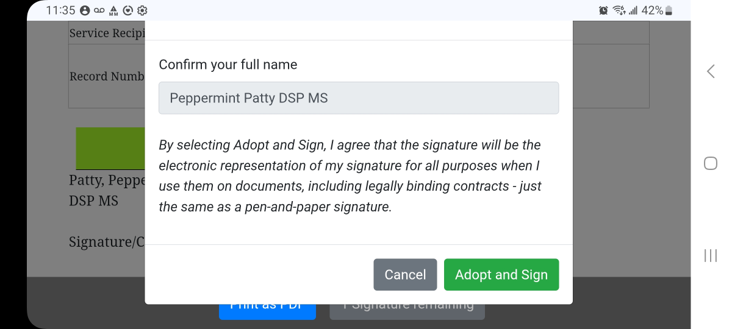
Clicking“Adopt and Sign” results in the option for users to select to Submit the
Signatures.
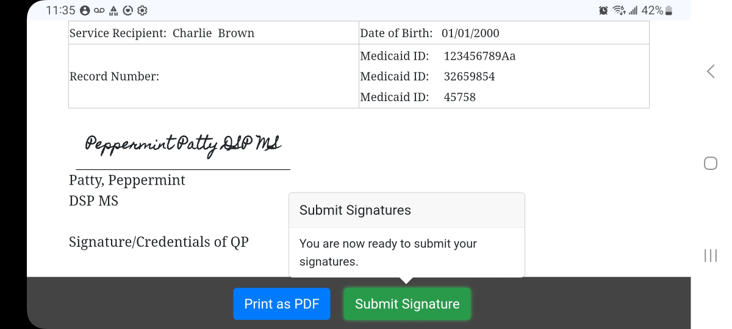
Lastly,clicking “Submit Signature” finalizes the process and offers a final pop-up
window allowing the user to confirm the Webform signing by providing a “Done”
button.
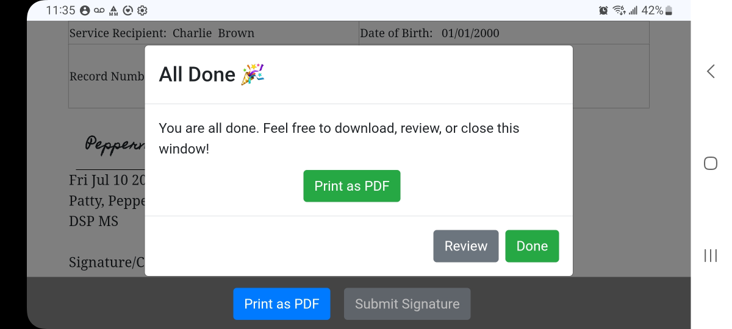
The other buttons available within the process, such as Review or Printing, provide users the additional options. Selecting to print the Webform opens the user’s local mobile device interface to print the Webform to a local printer.
Once the Webform is signed and the user returns to the Mobile application, the corresponding Webform card within the Action Center > Forms tab is removed.
OnTarget Desktop Application
2. Simplified Key Rules
OnTarget has introduced a new streamlined workflow for creating and managing Note Key Rules associated with short-term goals / outcomes. The updated process simplifies the key rule entry allowing users to align the expected automatic assessment key values applied to short-term goals / outcomes when end-users record intervention data.
The new process provides an option for users entering outcomes to easily and efficiently create assessment key rules without requiring the use of operators (<, >, or =). This enhances efficiency, reduces complexity, and provides a more user-friendly experience when working with outcome intervention configurations.
Application of the Simplified Key Rules is configurable per enter Note Key within List Configuration (List Configuration > Notes > Note Keys). This allows users to identify the Note Keys (Interventions) in which the simplification applies.
A new column, titled “Simplified Key Entry” has been added to the Note Keys List Configuration. The column includes a checkbox that, when checked, identifies the Note Key to be included in the simplified key rule process.
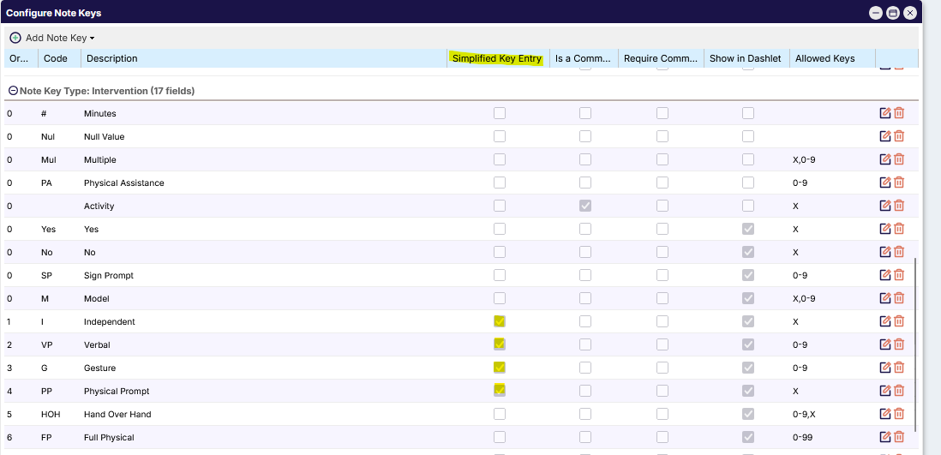
Once theselected Note Key(s) are configured, utilization of the Simplified Key Rule process is initiated from within a selected short-term goal / outcome of the Client Treatment Plan. Selecting a short-term goal / outcome displays the details providing access to the “Simplified Key Entry” button within the Key Rules section.
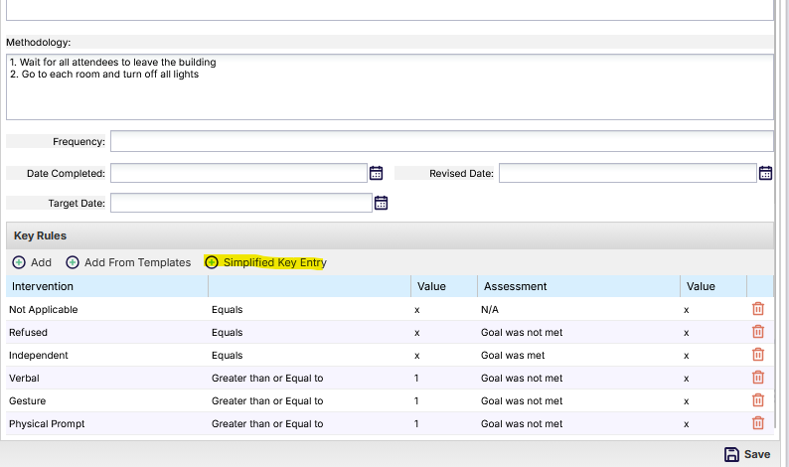
Clicking the button opens a Simplified Key Entry window where users can enter the needed details for creating a key rule.
1. Primary Intervention – Selection of an intervention that was identified as a Simplified Key Entry within the Note Keys List Configuration.
2. Maximum Value for Achievement – Users select an assigned key value associated to the selected Primary Intervention that correlates with the highest expected value in which the outcome is achieved. The values within the drop-down correspond with the configured Allowed Keys within the Note Keys List Configuration.
3. Achieved Assessment – Users select the Assessment value that is automatically applied when the end-user enters an intervention value meeting the Maximum Value for Achievement.
4. Not Achieved Assessment – Selection of the Assessment value automatically applied when the end-user enters an intervention value that exceeds the Maximum Value for Achievement.
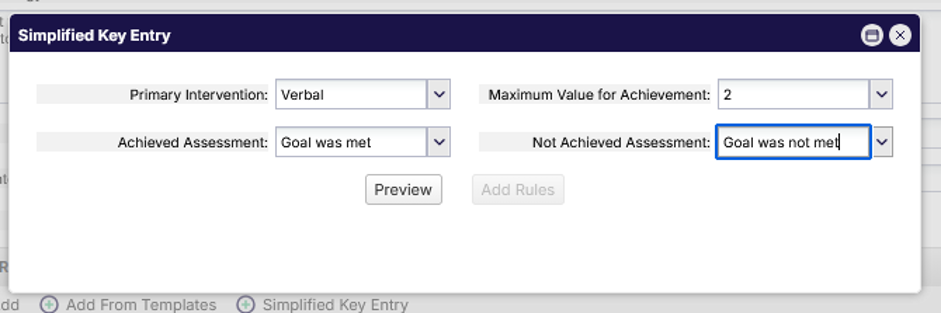
Once all the noted fields are entered with the needed / required values for the Key Rule, clicking the Preview button provides users with an updated window listing the Key Rules including the application of the Simplified Key Rule.
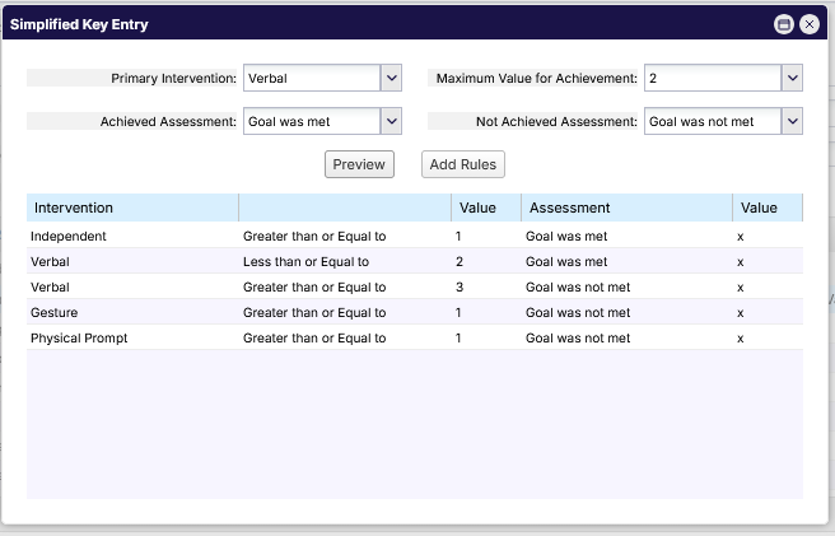
Clicking the “Add Rules” button applies the Simplified Key Rules created along with the additional listed key rules displayed within the Preview.
Please Note: Initiating the Preview button from within the Simplified Key Rule window applies already applied Key Rules and / or configured default key rules.
Please Note: Application of a Simplified Key Rule may require removal of an existing key rule that utilizes the same Intervention.
3. eMAR Security Configuration Update
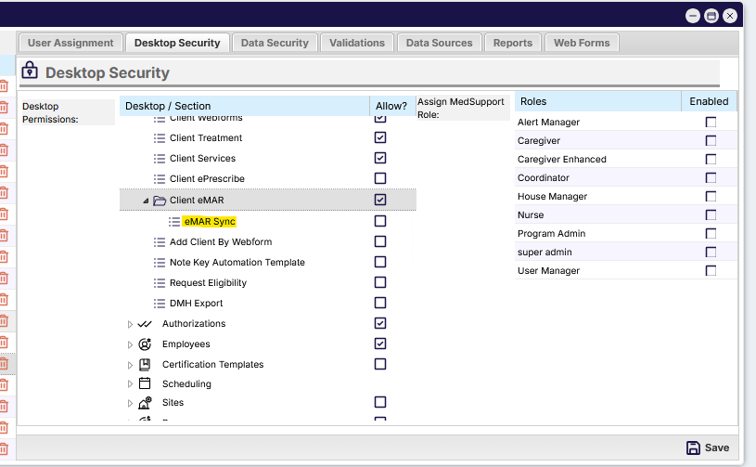
OnTarget has enhanced the role-based security for eMAR Sync functionality by allowing organizations to restrict access based on user role. Users assigned restricted roles can no longer modify or access the eMAR synchronization functionality when permissions are not granted.
Within the Desktop Security Role Configuration, a new security setting has been added within the “Client eMAR” permission. The added security configuration is titled “eMAR Sync”.
1. Enabling the security permission grants users assigned to the selected role access to the eMAR synchronization functionality within OnTarget.
2. Disabling the security permissions does not provide users assigned to the selected role access to eMAR synchronization functionality.
Please Note: This configuration setting is disabled by default.
4. Alternate Primary Care Physician for 837 Clam File
OnTarget has added support for including an Alternate Primary Care Physician (PCP) when generating 837 claim files has been introduced. Prior to this enhancement, Primary Care Physicians included within 837 claim files were selected as part of the Insurance entry in a Client record.
OnTarget now provides an alternate method for the inclusion of a Primary Care Physician from a different source inside OnTarget while maintaining the selected Primary Care Physician in the client insurance record.
Enabling the process to include a selected Alternate Primary Care Physician is initiated from within a Payer record. A field titled “Override Authorized PCP” has been added to override the process that utilizes the selected Primary Care Physician from the client Insurance record and utilizes a selected Primary Care Physician from a client authorization record to include in an 837-claim file.
Please Note: The process of utilizing the Alternate Primary Care Physician requires at least one Service record associated with the Payer to contain an enabled Require Primary Care Physician.
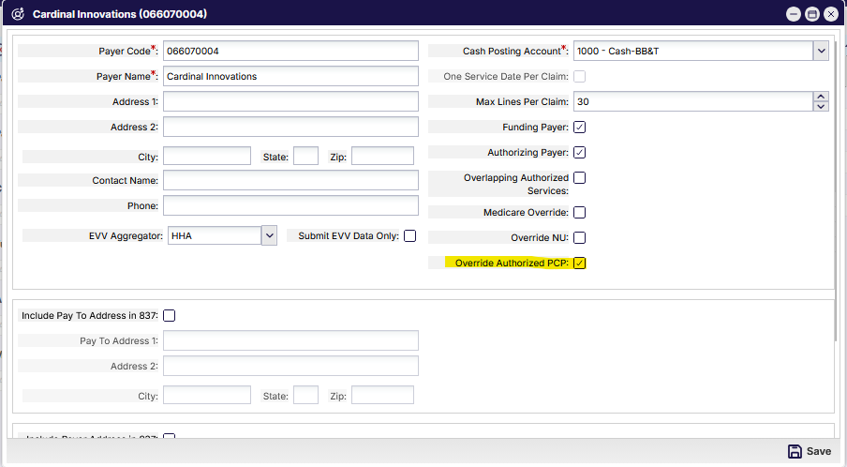
Enabling the “Override Authorized PCP” configuration within the Payer record opens a new field in a Client Authorization record for the selection of a Primary Care Physician. The field is only available for services in which the configured Payer record is associated.
Please Note: The “Primary Physician” field within the Client Authorization record is NOT required.
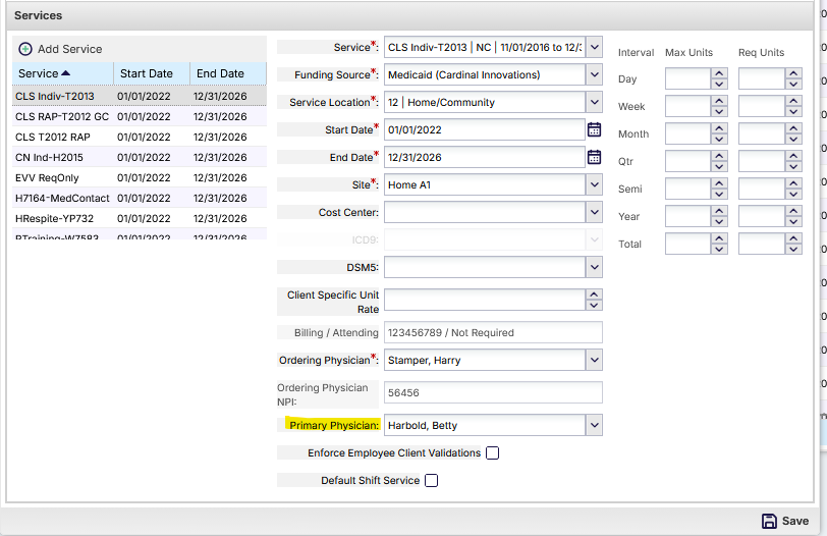
The selected Primary Physician selected in the Client Authorization is included in the 837-claim file rather than the selected Primary Care Physician within Client Insurance.
Please Note: When disabling the “Override Authorized PCP” setting within the Payer record, all selected Primary Physicians for the client authorizations are automatically removed.
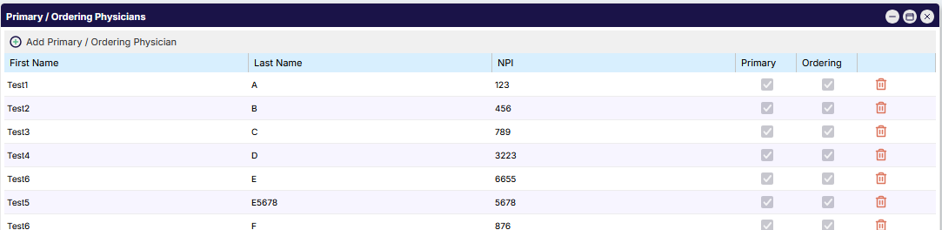
Selection of a Primary Care Physician for either the Client Insurance or the alternate selection in a Client Authorization requires a List Configuration entry. Physicians are entered within List Configuration > Clients > Primary / Ordering Phys. Users can enter needed physicians and identify the specific details.