.png)
17 Searching for Notes Using Filters
Search Grid Filters: Overview
The notes search grid is where you can search for particular notes using filters to restrict the search results. The following is an overview of the clinical-related filters that are available in the system. Note: all billing and payroll-related filters are discussed in a separate course.
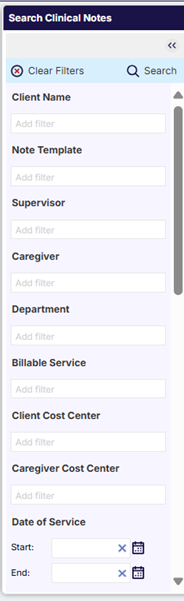
- Clear Filters is used to reset all filters. Alternate method: x out of each field individually.
- Client will restrict the grid based on the client name.
- Note Template will restrict the grid based on the type of note template.
- Supervisor will restrict the grid based on the supervisor name.
- Caregiver will restrict the grid based on caregiver.
- Billable Service will restrict the grid based on the billable service used.
- Client Cost Center will restrict the grid based on the assigned client cost center.
- Caregiver Cost Center will restrict the grid based on the assigned employee cost center
- Date of Service will restrict the grid based on the Start and End dates entered
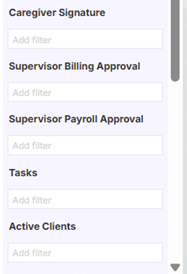
- Caregiver signature will restrict the grid based on whether or not the note has been signed
- Supervisor Billing Approval will restrict the grid based on whether or not the note has been approved (eligible billing). The grid can also be restricted for “all ineligible notes”.
- Tasks will restrict the grid based on whether or not notes have tasks. the grid can also be restricted to “ no or yes with open tasks or notes with closed tasks:.
- Active Clients will restrict the grid based on the status of the client. Options are available for Active, Inactive and All clients
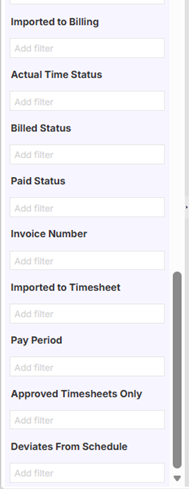
- Imported to Billing- will restrict notes that have been billed by selecting “yes” or no”
- Actual Time Status- this filter helps restrict notes based on the time status of the note, your selections are “ok, revision and or blocked” This is helpful when wanting to filter notes that are in revision and or blocked prior to being billed.
- Billed Status- this filter will allow you to filter notes based on if they have been “billed and or unbilled” This can be helpful when searching for notes that need to be corrected after the billing process has been completed.
- Paid Status- this filter will help restrict notes based on whether the staff has been “paid or unpaid”
- Invoice Number- you can filter notes based on the invoice number connected to notes once they have been billed, you can enter more than one invoice number to view multiple notes by putting in any additional invoice numbers at add filter box.
- Imported to Timesheet- this filter will allow you to view notes that have been added to the staff’s timesheet, you can select “yes or no” selecting “no” will show notes not associated with a timesheet.
- Pay Period- will allow you to filter notes associated to a certain pay period that was configured based on your agency’s specific pay cycles entered at Configure>List Configure>Timesheets> Pay Periods.
- Approved Timesheets only- will allow you to view notes that are on timesheets only by selecting “yes or no”
- Deviates From Schedule- will allow you to filter any notes that do not match what was scheduled on the client’s schedule, this can be helpful when receiving max weekly or max total units error message, any note that was edited by staff that do not match what was on the schedule will appear helping to narrow down notes that may be causing these errors.
Using the Search Grid Filters
This section of the course will guide you through the process of filtering and searching for notes.
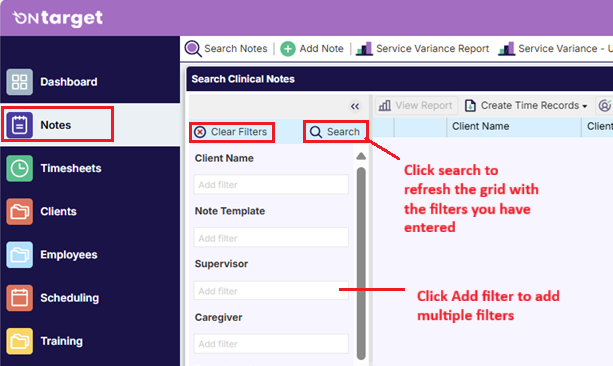
1. Click on Notes
2. Use the Notes Search grid filters to locate the note(s) that you wish to review.
- Helpful Hint: Many of the filters allow for multiple entries. Simply click on “Add filter” to add any additional filters (if available).
3. Click on the Clear Filters button to clear any filters that you have entered
4. Click on the Search button to refresh the grid with the filters the you have entered
Saving, Selecting, and Editing Views
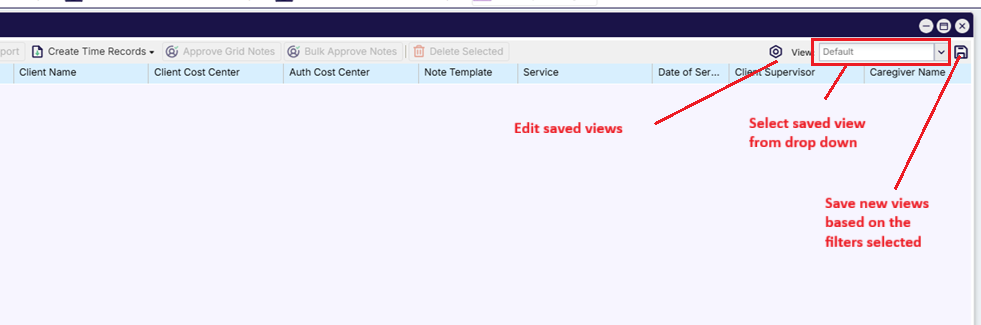
A “View” is a snapshot or save of any filters entered at the search grid. By saving a View, it can be recalled later as a quick method of plugging in filters instead of having to manually add filters in. This section of the course will walk you through the steps for saving, selecting and editing a view.
1. Saving: With the desired search filters entered from the Notes search grid, click on the Save icon (upper right corner) to save a view
2. From the Save View dialogue, name the view and click on the Save button
- Helpful Hint: Click on “Existing View” to select and overwrite an existing view.
3. Selecting: Click on the View selection drop-down to select a saved view
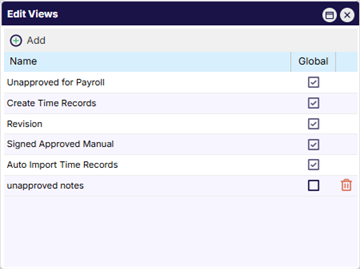
4. Editing: Click on the Edit Views button (wrench) to delete a view or make it Global view.
- Helpful Hint: Global views can be selected by any user who has access to the search grid.
5. Click on the Delete icon to delete a view or the Global checkbox from the “Edit Views” dialogue to make a view Global.
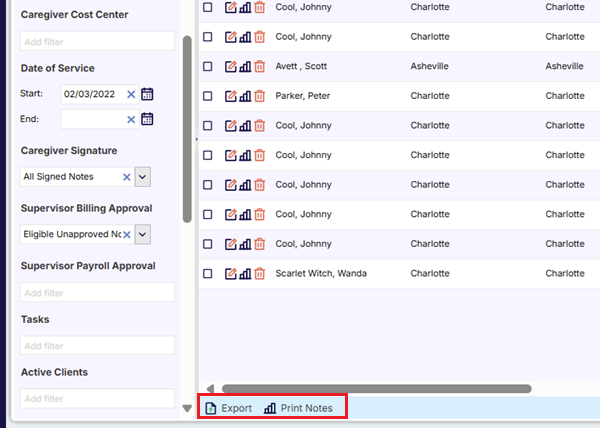
Exporting from the Grid
• You can export a print-friendly grid containing all of column headers and
corresponding information for notes selected from the grid view (service, date of service, supervisor, caregiver, etc).
1. Click on Notes
2. Use the Notes Search grid filters to locate the note(s)/info. that you want to export.
3. Click on the Search button to refresh the notes grid
4. Click on the Export button (bottom of grid)
5. Click on the Export drop-down from the report window to select a file type for export or click on the print icon to print.