.png)
04 How to Manage Missed Shifts
Missed Shifts Overview
It is important to understand how to handle missed shifts when scheduling in the system. Proper documentation of missed shifts is crucial not only for accurate record keeping and information purposes, but also for maintaining accuracy with regards to authorized unit counts. Missed shifts are primarily managed by adding missed shift types to scheduled events. This course will outline the configuration points that are required as well as the best-practice workflow for managing missed shifts.
Configuring Time Schedule Statuses
Time schedule statuses should be configured as part of the overall workflow for documenting missed shifts. Although not required for managing missed shifts, time schedule statuses can be an import part of the overall workflow. This section of the course will focus on configuring time schedule statuses.
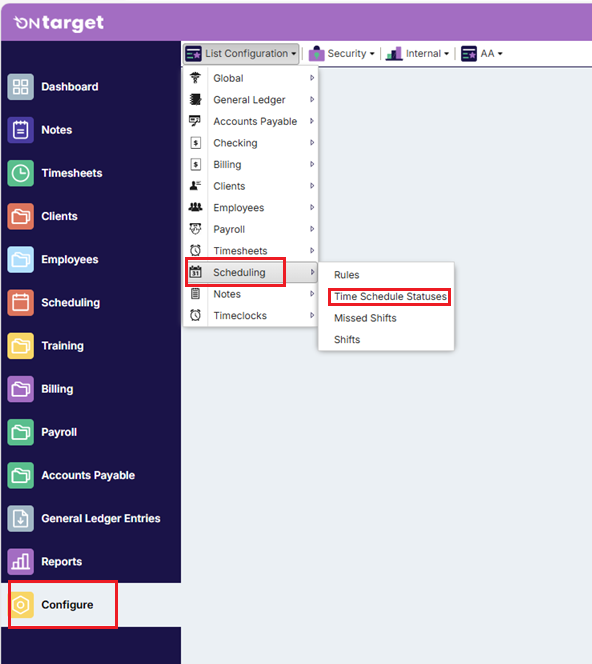
- Click on Configure
- Click on List Configuration
- Select SchedulingTime Schedule Statuses
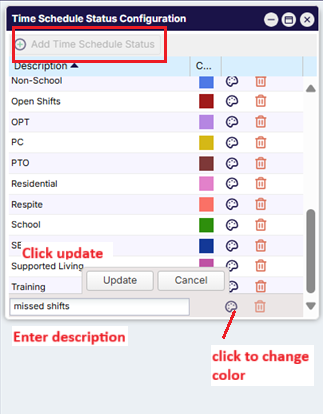
- Click on the Add Schedule Status button
- Enter a Description and click on the Update button
- Helpful Hint: You can change the default color for the schedule status by clicking on the color palate icon. Although there is a great deal of flexibility with the schedule status setup/coloring, statuses that relate to missed shifts are often coded w/ a single color for simplicity of workflow.
Configuring Time Schedule Statuses
Configuring Missed Shifts
Missed shifts descriptions need to be configured as part of the overall workflow for documenting missed shifts. This section of the course will focus on configuring missed shifts descriptions.
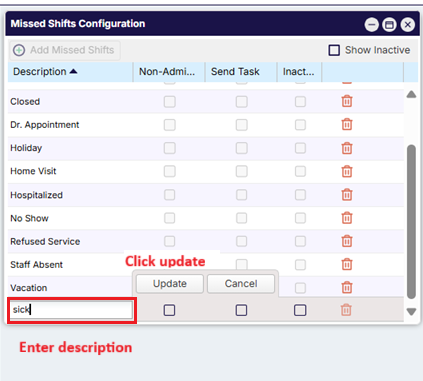
- Click on Configure
- Click on List Configuration
- Select Scheduling > Missed Shifts
- Click on the Add Missed Shifts button
- Enter a Description and click on the Update button
- Helpful Hint: It is recommended that you be as detailed with your missed shifts descriptions as possible. This will allow for better searching/reporting on missed shifts from the Scheduling desktop.

Managing Missed Shifts
This section of the course will focus on the workflow for managing missed shifts from the Scheduling desktop.
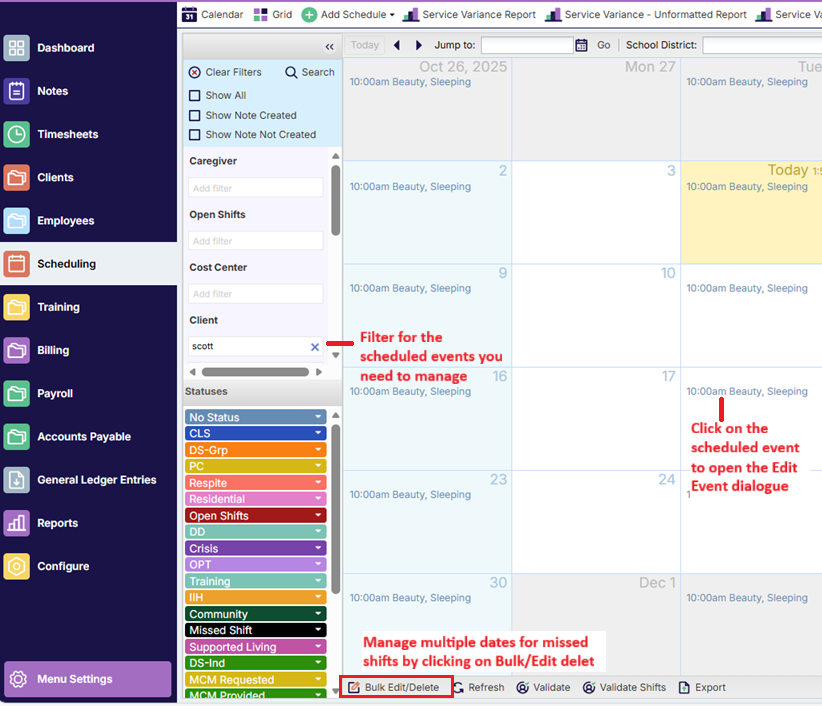
- Start by navigating to the Scheduling desktop and locating the scheduled event that you need to change to a missed shift.
- Helpful Hint: Remember that you can use the filters available from the Calendar or Grid views to locate the scheduled events that you need to manage.
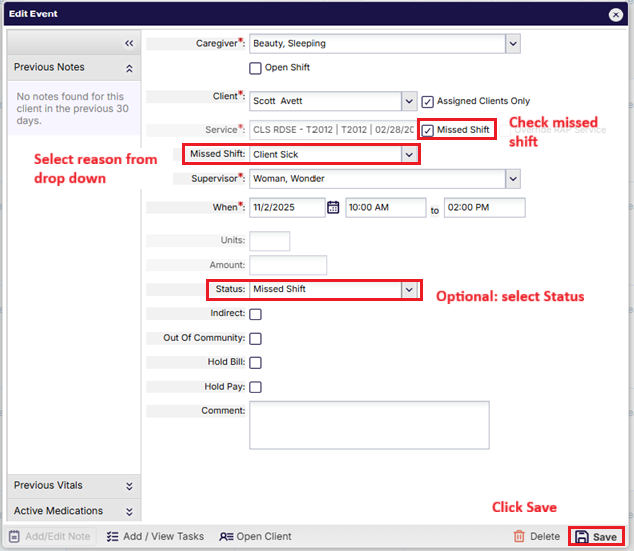
- If you want to manage a single scheduled event, click on the event to launch the “Edit Event” dialogue.
- Helpful Hint: You can also mark multiple scheduled events as missed shifts by using the Bulk Edit function.
- Click on the Missed Shift checkbox.
- Select the Missed Shift reason from the drop-down. Optionally, select/change the schedule status from the Status drop-down to a status that corresponds with a missed shift.
- Click on the Save button
- Helpful Hint: By changing a billable scheduled event to a missed shift, any authorized service units that were bound to the scheduled event are freed up.
Missed Shifts Reporting
This section of the course will focus on missed shifts reporting from the Scheduling desktop.
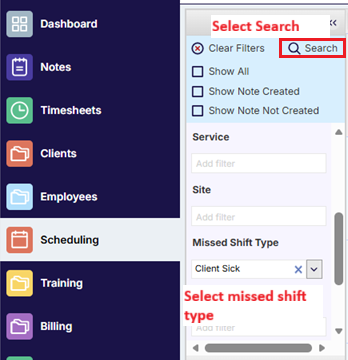
- Start by navigating to the Scheduling desktop.
- From the Calendar view, select the Missed Shift Type from the drop-down for which you want to filter.
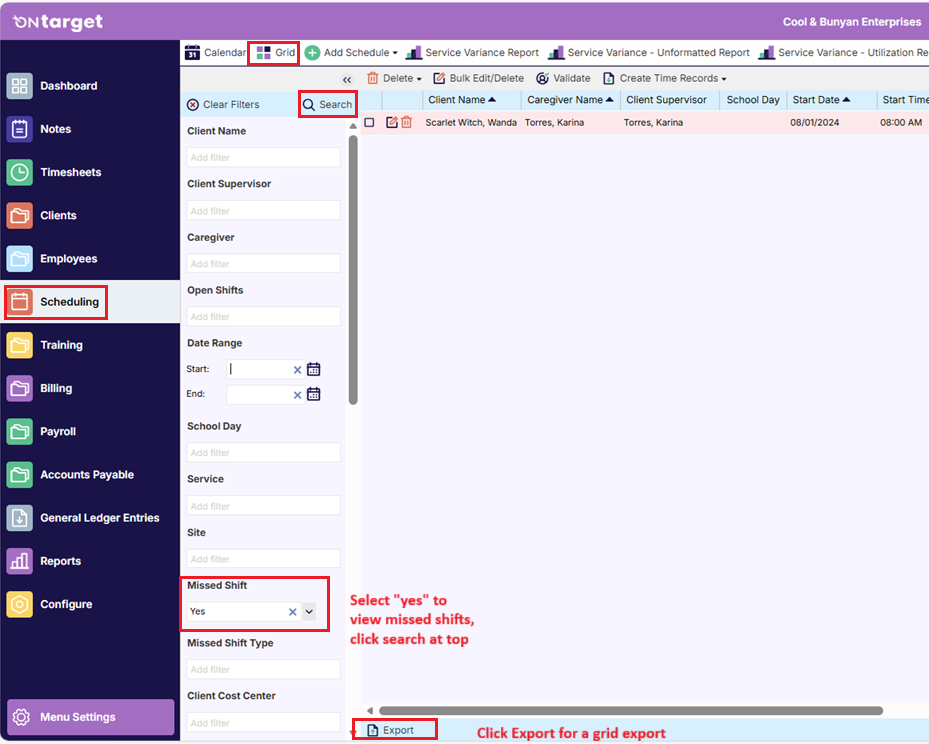
- Helpful Hint: From the Grid view you have the same Missed Shift Type filter available, but you also have a general “Missed Shift” filter. Select “Yes” to search for all missed shifts regardless of type.
- Click on the Search button to refresh the page (Calendar and Grid views)
- Helpful Hint: If you have changed the schedule status on a missed shift to one that relates to a missed shift, you can use the Statuses for filtering too.
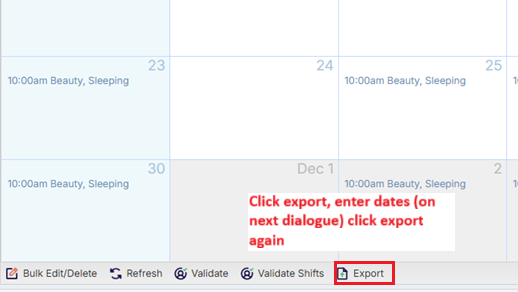
4. From the Calendar view, click on the Export button
- Enter a date range from the dialogue and click Export again. Note: you can further export to the desired file type from the Schedule Report.
- Helpful Hint: From the Grid view, you can click Export for an export of the entire grid at scheduling. You can further save this export to the desired file type.
Missed Shifts Reporting: Calendar View
Missed Shifts Reporting: Grid View
Expanded Functionality for Marking Missed Shifts
OnTarget has enhanced the functionality for marking scheduled events as missed by introducing advanced configurations for Missed Shift Reasons. Additionally, this capability has been extended to users with Read-Only access to the Scheduling module, allowing them to designate a scheduled service as missed prior to creating a service note or clocking in for an EVV-scheduled service.
Role Security Configurations
Users with Full Access to Scheduling are inherently granted the ability to mark scheduled events as missed through the Scheduling Event window. For roles with Read-Only access to Scheduling, a new sub-configuration titled "Marked Missed Shifts" has been added within Role Desktop Security (Configure > Security > Configure Roles > Desktop Security). This applies to Scheduling configurations such as My Calendar (Read Only) and All Calendars (Read Only).
By expanding the Scheduling security configuration, administrators can view the available options that enable users with Read-Only access to mark a scheduled service as missed before creating a service note or clocking in for an EVV-scheduled service.
Expanding the role desktop security configuration for My Calendar (Read Only) reveals the option to “Mark Missed Shifts”.

Similarly, expanding the role desktop security for All Calendars (Read Only) opens the configuration option to “Mark Missed Shifts”.

Please Note: By default, the configuration for “Mark Missed Shifts” is disabled.
Missed Reasons List Configuration
When marking a scheduled service as missed, users can select a configurable reason to indicate the cause of the missed shift. These reasons are managed through the “Missed Shifts” List Configuration (Configure > List Configuration > Scheduling > Missed Shifts), which allows for full customization to meet organizational needs. OnTarget has enhanced this configuration by introducing additional options designed to streamline and simplify the process.

The enhanced configuration options include the following features:
- Non-Admin – This optional column specifies which Missed Shift Reasons are available for selection by users with Read-Only access. The drop-down list presented to these users is filtered to display only the reasons that have been enabled (i.e., checked) within this column.
- Send Task – When this optional checkbox is selected, it enables an automated task notification to be sent to the scheduled client’s supervisor whenever a service is marked as missed using the associated reason. The task message includes detailed information about the missed shift to facilitate appropriate and timely follow-up.
Please Note: The ability to mark reasons as inactive or to delete existing reasons remains available.

Marking Scheduled Shifts as Missed for Non-Multi Time and Non-Multi Day
While the option to mark scheduled shifts as missed from within the Schedule Event window remains available, OnTarget has expanded this functionality to allow users to designate scheduled shifts as missed prior to starting a service note or clocking in for an EVV-scheduled service.
When selecting a non-EVV scheduled shift from either the Scheduling or Notes module within the OnTarget desktop, users are presented with an initial service note window. At the bottom of this window, a “Miss Shift” button is available. Selecting this button initiates the workflow to properly mark the scheduled shift as missed.
Additionally, the previously labeled “Save” button in the initial service note entry window has been updated to “Create Note.” This button follows the standard workflow for initiating and completing a service note without any functional changes.
Please Note: Once the “Create Note” button is selected, the service note is initiated, and the option to mark the scheduled shift as missed is no longer available.

Marking Scheduled Shifts as Missed for Multi Time and Multi Day
Similarly, when selecting a non-EVV scheduled shift associated with a Multi Time or Multi Day template from either the Scheduling or Notes module within the OnTarget desktop, users are provided the option to mark the selected shift as missed using the “Miss Shift” button.
Important: The “Miss Shift” button is only available if no entry has been added to the “Add Date / Time” entry box. Once a date and time has been entered, the “Miss Shift” option becomes unavailable.
Since users begin the process by selecting a specific scheduled shift (date and time), there is no need to manually complete the Add Date / Time entry. OnTarget automatically uses the originally selected shift, allowing users to efficiently mark it as missed.

Marking Scheduled Shifts as Missed for EVV-Scheduled Services
As previously noted, users can mark scheduled service shifts as missed prior to creating a service note or editing a time clock for an EVV-scheduled shift. When selecting a scheduled EVV shift from either the Scheduling or Notes module within the OnTarget desktop, users are presented with a prompt offering the following options: Edit Timeclock, Miss Shift, or Cancel—enabling them to mark the shift as missed before initiating the completing the time clock process.
Please Note: The option to mark a scheduled EVV shift as missed is not available when using the Clock In button located at the top of the OnTarget desktop screen.

Marking Future Scheduled Shifts as Missed
Within the Scheduling module of the OnTarget desktop, users have the ability to mark future scheduled shifts as missed. While OnTarget restricts the creation of service notes and clock-ins for future-dated shifts, users are presented with the option to mark the shift as missed through the message window that appears upon selection.

Please Note: The availability for users to mark an overnight shift schedule as missed is NOT available.
Missed Shift Entry Window
When a user selects the “Miss Shift” button—either from the initial service note entry window or from an on-screen prompt—a new Miss Shift Entry window is displayed. Users are required to select a reason from the Reason drop-down menu and may optionally enter a comment. Upon saving, the scheduled shift is successfully and properly marked as missed.
Depending on the user's Scheduling access permissions, the shift may no longer be available for further selection.

Please Note: As previously mentioned, the available options in the Missed Shift Reason drop-down are determined by the Miss Shift List Configuration and are based on the user’s Scheduling permissions. If the selected reason is configured accordingly, an automated task will be sent to the client’s supervisor to notify them of the missed shift.