.png)
05 Mobile App: Missed Shifts & Adding Schedules
Marking Scheduled Shifts as Missed
OnTarget has introduced a new capability within the mobile application that allows users to mark scheduled shifts as missed. This enhancement complements the recently expanded functionality for managing missed shifts in the OnTarget desktop platform.
Access to this feature aligns with the updated desktop role security settings. Users with Full Access to Scheduling automatically can mark shifts as missed within the mobile app. For users with Read-Only access to Scheduling, a new sub-configuration ”Marked Missed Shifts" has been added under Role Desktop Security (Configure > Security > Configure Roles > Desktop Security).
This setting applies to Scheduling views such as My Calendar (Read-Only) and All Calendars (Read-Only), ensuring consistency between desktop and mobile platforms.
Access to Mark a Shift as Missed
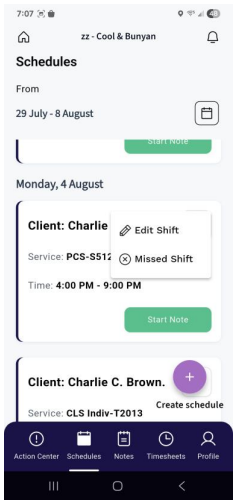
The ability to mark a scheduled shift as missed within the mobile application is contingent upon the status of the shift. Users can only mark a shift as missed if it is not associated with a created service note or a time clock entry. These eligible shifts can be identified across the following modules within the mobile application:
- Schedule page
- Notes page, under the Not Started tab
- Action Center, for any card labeled as Not Started
Within each of these modules, eligible shift cards feature an ellipsis menu (three dots) located in the top-right corner. Selecting this menu reveals additional shift actions, including the "Missed Shift" option.
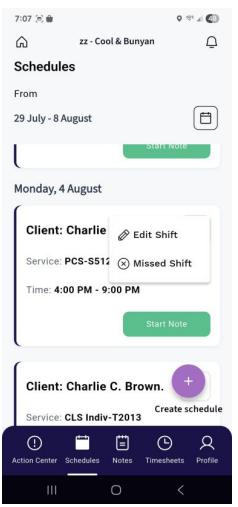
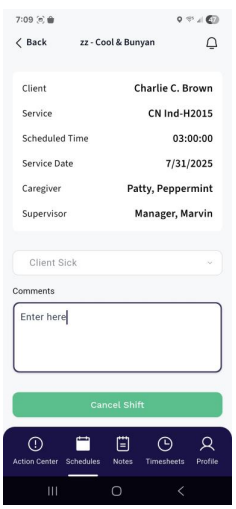
Selecting the "Missed Shift" option for a scheduled shift that is not associated with multiple time entries on the same date will direct the user to a dedicated page to complete the required information.
On this page, users must select a Reason for the missed shift from a drop-down list. Additionally, there is an optional field for entering comments to provide further context.
Once the necessary information has been entered, clicking the Cancel Shift button will save the missed shift entry.
Please Note: Once a scheduled shift is marked as "Missed", the corresponding shift card will no longer appear within the mobile application.
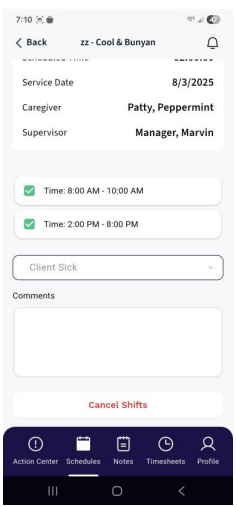
Since the mobile application automatically consolidates scheduled shifts that share the same service date, caregiver, client, and service, users will be presented with the option to select one or more of these grouped shifts to mark as missed. A single Reason can be selected and applied to all chosen shifts during this process.
When editing an existing scheduled shift, the fields available for modification depend on the current state of the shift:
- If the shift is associated with an existing service note or time clock record:
Users can only modify the scheduled time. The service date, client, and service cannot be changed.
- If the shift is not associated with a service note or time clock record:
Users may edit the service date, assigned client, service, and scheduled time.
Creating a Scheduled Shift
Within the Schedule page of the mobile application, a "Create Schedule" button is located in the bottom-right corner of the screen. This button is exclusively available on the Schedule page and is not accessible from other areas of the application.
Clicking the "Create Schedule" button opens a form that allows the user to enter the necessary details for the scheduled shift, including the service date, client, authorized service, and scheduled times.
The order of data entry is important: the service date must be selected first, followed by the client. Once both the service date and client are selected, the mobile application will populate a drop-down list of authorized services available for the selected client on the specified date.
Please Note: The client drop-down list is dependent on the logged-in user’s access level. Users may see only their assigned clients or all clients, based on the role configuration in desktop security. This is controlled via the following setting:
Configure > Security > Configure Roles > OTC Global Permissions > Only Show Assigned Clients
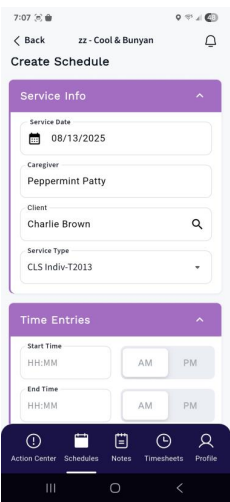
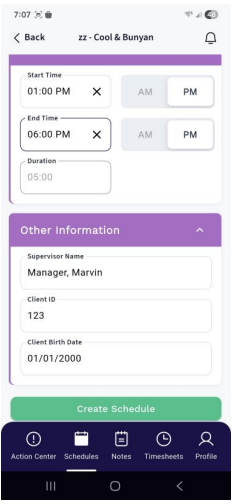
When creating a scheduled shift, time entry options are determined by the configuration of the associated service. This ensures users enter time in the format expected for that service, which may include:
• Start and end times
• A duration of time
• A restriction to start and end time entry only
After entering the required information, clicking the "Create Schedule" button finalizes and saves the new scheduled shift.
Please Note: The mobile application enforces specific date range restrictions for creating scheduled shifts:
1. Past Dates: Users can create scheduled shifts for past service dates based on the Late Note Number of Days configuration. This setting defines how many days in the past a service note can be signed relative to the scheduled date.
2. Future Dates: Users can create scheduled shifts up to 90 days in advance from the current date.
Access for Editing an Existing Schedule
As previously mentioned, users can edit existing scheduled shifts in the mobile application, provided the shift's status allows for modification. The Edit Shift option is available in the following modules:
1. Schedule page
2. Notes page – under the Not Started tab
3. Notes page – under the Unsigned tab
4. Action Center – for any card labeled Not Started or Not Signed
Similar to the "Missed Shift" functionality, users with Full Access to Scheduling can access the Edit Shift option by selecting the ellipsis (⋮) menu located in the top-right corner of the corresponding shift card in the modules listed above.
Editing an Existing Single- Time Scheduled Shift
Users can access the "Edit Shift" option by selecting it from the menu available through the ellipsis
(⋮) button.
When the "Edit Shift" button is selected, the user is directed to a screen where the editable details of the scheduled shift can be modified. After making the desired changes, the "Update Schedule" button becomes available, allowing the user to save the updates. The changes are immediately reflected upon refreshing the page within the mobile application.
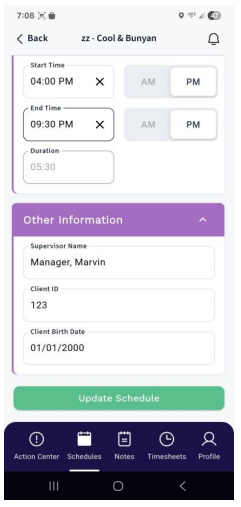
Please Note: As stated above, the available data for which the user is allowed to edit for an existing scheduled shift is dependent on an association to an existing service note or time clock record.
Editing an Existing Multi- Time Scheduled Shift
As the mobile application automatically consolidates scheduled shifts that share the same service date, caregiver, client, and service, users will be prompted to select a specific shift time when initiating an edit.
Before being directed to the Edit Shift page, a selection prompt appears, allowing the user to choose which of the listed shift times should be edited.
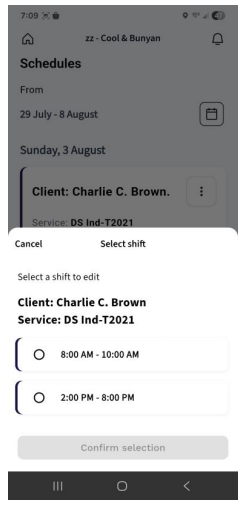
Once a shift time is selected, the "Confirm Selection" button becomes active. Clicking this button directs the user to the Edit Schedule page.
Scheduling Validations
OnTarget runs a validations process when saving a newly created scheduled shift or editing an existing scheduled shift. To ensure any triggered validations are appropriately listed and handled, the mobile application provides users with the option to override triggered validations if applicable.
When validations are triggered upon saving a created or edited scheduled shift, the mobile application displays a pop-over window listing the validations.
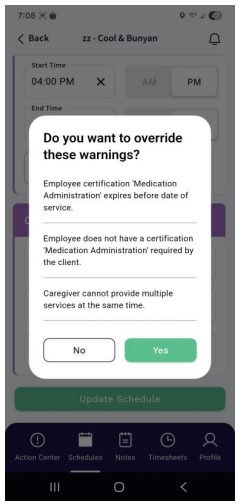
Based on OnTarget role configurations, when all triggered validations are eligible for override, users are presented with the option to either override the validations (yes) or cancel (no). If the user chooses not to override, the scheduled shift creation or edit will not be saved. Of course, electing to override the listed validation results in a successfully saving the scheduled creation or edit.
However, if any of the triggered validations cannot be overridden, the override option is not presented. Instead, users will see a list of the applicable validations and must click "OK" to acknowledge them. In this case, the scheduled shift cannot be created or updated until all nonoverridable validations are resolved.